Non-Destructive Testing (NDT) Services

At Vertech, we offer non-destructive testing (NDT) services to companies in many industries that possess assets or infrastructure. Our comprehensive range of conventional and advanced NDT services ensures our clients receive first-class deliverables.

Vertech has proven experience in NDT inspection planning, advising clients on NDT services, and providing recommendations and solutions to comply with international and Australian standards.

Vertech Group is certified to ISO 17025 as an NDT inspection body by the National Association of Testing Authorities (NATA), accreditation number 18112. Our NDT inspection personnel are highly qualified, skilled, and experienced in applying various NDT inspection services and testing methods.

What is Non-Destructive Testing?

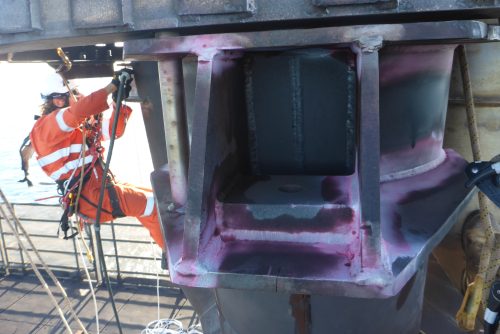
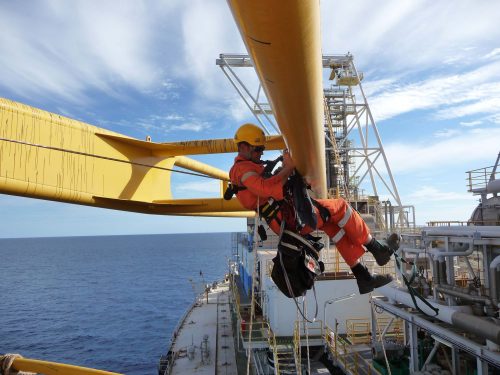
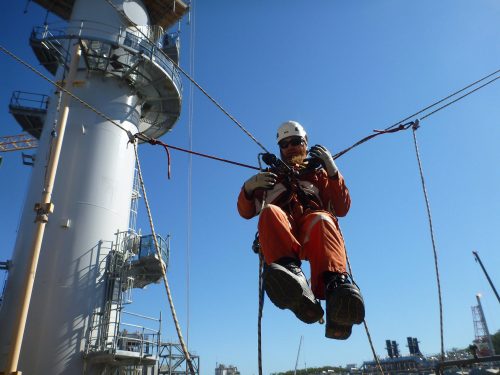
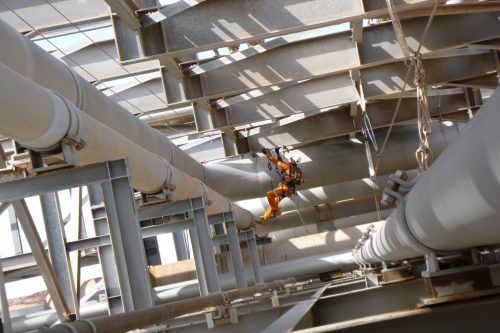
A Vertech IRATA rope access technician conducts a DPI inspection of offshore welds.

Non-Destructive Testing (NDT) is a set of inspection and testing techniques used to evaluate the properties and integrity of materials, components, or structures without causing any damage or alteration to the item being examined. NDT plays a crucial role in various industries, including oil and gas and mining, to ensure product and structure safety, reliability, and quality.

NDT technicians and inspectors must be trained and certified in their specific methods, as each technique requires specialised knowledge and equipment.

Overall, Non-Destructive Testing is a fundamental component of quality control and risk assessment in various industries, contributing to the longevity and safety of products and structures while minimising the need for destructive testing methods that can be costly and impractical.

Conventional NDT Services

Safety, reliability, environmental requirements, and regulations all mean that companies across multiple sectors have a responsibility to maintain the integrity of their equipment.

Vertech has a proven track record across the Asia Pacific region in delivering a wide array of conventional non-destructive inspection and non-destructive testing methods. Sonomatic provides NDT by planning campaigns, advising clients on NDT methods, and providing recommendations & solutions to ensure code compliance to both international and Australian Standards.

Underpinned by specialist access and robotics, Vertech provides a base inspection service and manages the end-to-end solution from high mobility specialist access using rope access, engineered decking and netting systems through to deployment via ROV, UAV, or crawler deployed systems.

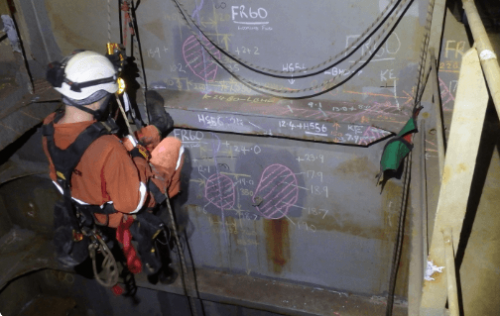
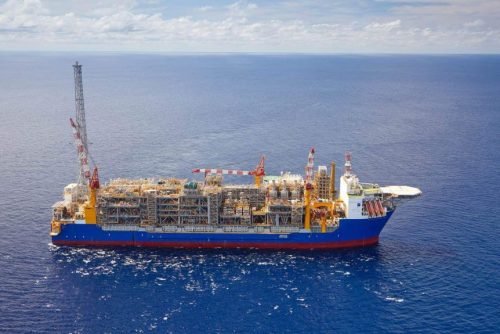
Conventional NDT Services by a marine class inspector on an offshore FPSO as paet of a special survey.
Our conventional NDT services include:
  • Ultrasonic Testing (UT)
  • Magnetic Particle Testing & Inspection (MT)
  • Dye Penetrant Testing & Inspection (PT)
  • Eddy Current Testing & Inspection (ECI)
  • Film Radiographic Testing (RT)
  • Digital Radiography (DRT)
  • Corrosion Mapping (C-Scan)
  • Proof Load Testing (PLT)
  • Dimensional & Visual Inspection (VT)
  • Positive Material Identification (PMI)
  • Laser Testing, Scanning & Mapping (LT)
  • Thermographic Inspection (TI)
  • Computerised Radiography (CRT)

Specialised Non-Destructive Testing Services

Sonomatic boasts an industry-leading record and reputation for delivering cutting-edge, advanced Non-Destructive Testing (NDT) inspection services. As the world’s premier provider of advanced ultrasonic inspection services, we have over 30 years of experience in this sector. Our innovative approach continually pushes visual inspection boundaries with current and emerging technologies. The Group possesses a comprehensive portfolio of patents related to MEC™ (Magnetic Eddy Current Technology) tooling and its application methods. Our topside NDT inspection solutions employ advanced techniques, aligning with recognised industry standards and bespoke client requirements.

These services are essential for supporting global industries’ safety and integrity requirements. This extensive experience underpins our ability to offer novel solutions to inspection challenges. We are committed to evolving the scope of what’s achievable in inspection services. This portfolio underscores our commitment to innovation and technical excellence in NDT inspection. These solutions are underpinned by rigorous development and validation processes, ensuring high-quality and reliable inspection services.

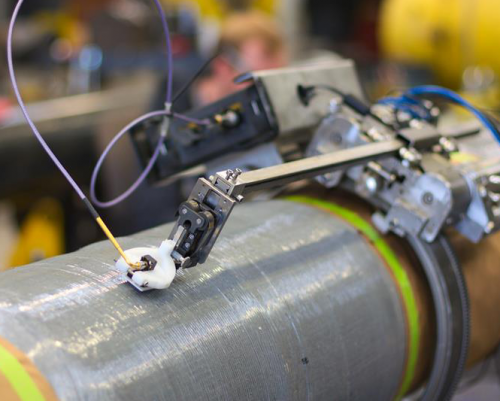
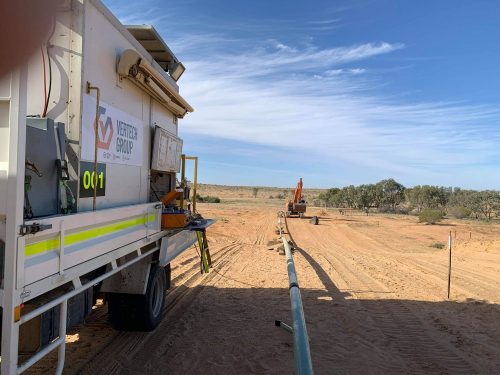
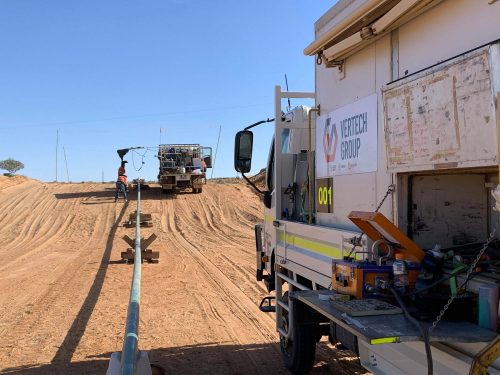
A specialised NDT system conducting through a composite wrap applied to a pressure piping system.
Our specialised NDT services include:
  • Time of Flight Diffraction
  • Phased Array (PA)
  • Long Range UT (LRUT)
  • Advanced Tube Inspection
  • Alternating Current Field Measurement (ACFM)
  • Multi-Skip Inspection
  • Non-Intrusive Inspection (NII)
  • Electromagnetic Testing (EMAT)
  • Microwave Testing
  • Dynamic Response Spectroscopy (DRS)
  • Creeping/Head Wave Inspection Method (CHIME)

Benefits of NDT Inspection Services

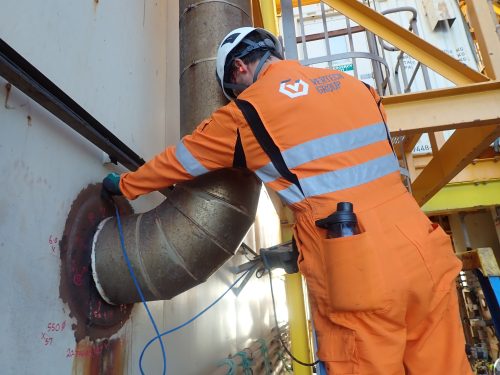
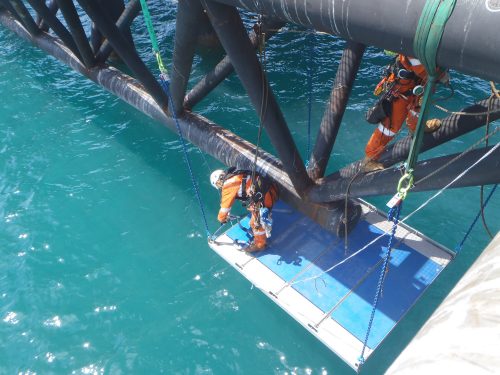
A vertech Non-destructive testing (NDT) technician conducting ultrasonic thickness (UT) measurements on an offshore asset.

Non-destructive testing (NDT) services offer numerous benefits to projects, ensuring the safety, quality, and longevity of your assets. Below are some of the advantages of our NDT services.

  • Preservation of Project Integrity: NDT methods are designed to assess the condition and strength of materials without causing damage or alteration. This means that assets can continue functioning throughout the testing process. Vertech’s NDT services employ a range of testing methods, such as penetrant testing, leak testing, and visual testing, all contributing to noninvasive evaluations.
  • Safety Assurance: Projects can ensure the safe operation of equipment and facilities by employing NDT services. Using methods like remote field testing, Vertech can identify potential weaknesses or failures before they lead to serious safety hazards, preventing accidents and enhancing overall project safety.
  • A Cost-Effective Solution to Other Methods: Detecting defects early through non-destructive evaluation can save projects significant repair and replacement costs. By catching flaws before they become critical, Vertech’s NDT services can prevent expensive downtime and extend the service life of your assets.
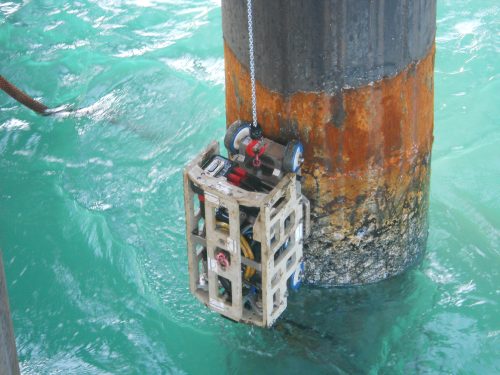
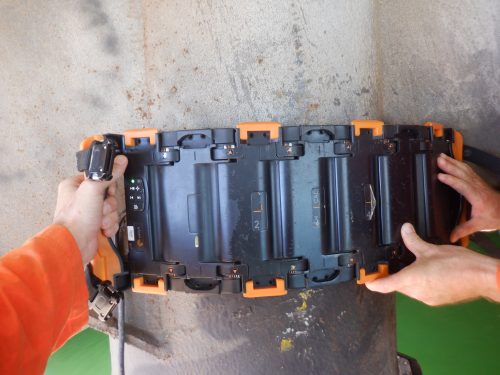
A MEC-MPS marinised scanner built to support the splash zone inspection of offshore assets using high-resolution ultrasonic mapping, Pulsed eddy current (PEC), laser triangulation and visuals with a camera system
  • Comprehensive Assessments: We have a range of NDT methods at our disposal, so we can provide a comprehensive assessment of your project. This includes a full spectrum of evaluations, from penetrant testing for surface-breaking defects to leak testing for ensuring the integrity of seals and joints to visual testing for an overall assessment.
  • Accurate Results Every Time: The NDT methods employed by Vertech, like remote field testing, offer highly accurate data. This precise, non-destructive evaluation allows for informed decision-making about maintenance schedules, operational life, and potential renovations or replacements.

Why Choose Vertech Group for NDT Services?

We know we aren’t the only NDT service company in the industry – but we have faith that our expertise, personnel, and experience allow us to deliver what others cannot.

Choosing Vertech Group for your NDT services has several unique advantages that set us apart. Our commitment to excellence, comprehensive knowledge of various testing methods, and an unyielding focus on customer satisfaction are among the many reasons why we are a trusted name in nondestructive testing.

We have invested in state-of-the-art equipment and continual staff training to ensure we deliver reliable and efficient NDT methods.

Our team of certified technicians possesses a deep understanding of various testing methods. Whether it’s liquid penetrant tests, visual inspection, or ultrasonic tests, we ensure each method is tailored to meet the specific requirements of your project. Our broad experience allows us to choose the most effective approach for each situation, guaranteeing optimal results every time.

At Vertech Group, customer satisfaction is at the heart of our service delivery. We aim to provide our clients with the most detailed, accurate, and efficient nondestructive testing services while maintaining open lines of communication. We believe that understanding our clients’ needs and expectations is key to our success.

We offer an unmatched combination of advanced technology, in-depth expertise, and customer-centric services. With us, you can rest assured that your project’s integrity is in safe and capable hands.

NDT Techniques

Alternating Current Field Measurement (ACFM) is an electromagnetic technique to detect and size surface-breaking cracks in conductive components and welds. It combines the advantages of the Alternating Current Potential Drop (ACPD) technique and Eddy Current Testing (ECT) regarding defect sizing without calibration and the ability to work without electrical contact.

The Alternating Current Field Measurement – or ACFM – technique was specifically developed to detect and size surface-breaking defects on and around rough welds through several millimetres of non-conductive coating. This is a crucial advantage because the costs associated with paint removal, post-MPI re-blasting, and recoating are typically four or five times more expensive.

While the primary failure point in storage tanks is corrosion in the floor plates, from either the top surface or the underside, the welded sections are also a direct source of damage mechanisms. ACFM is the most cost-efficient and trusted method for inspecting storage tank welds to supplement corrosion mapping, successfully detecting large cracks often missed by MPI.

You can't deny the cost savings of ACFM over MPI; overall, ACFM jobs are typically six times less expensive than their MPI counterparts while providing the added value of a more reliable inspection with data-rich information to pass along to the asset owner.

Benefits:

  • Applicable for base material or welds, ferritic or non-ferritic conductive metals
  • It can be used on hot surfaces, underwater, or in irradiated environments
  • Provides both depth and length information
  • Accurate sizing of defects up to 25mm in depth
  • Requires minimal surface preparation and can be applied over paint and other coatings
  • Applicable for underwater inspection as well as regular inspection
  • Inspection data can be stored and analysed offline
  • Inspection can be encoded
  • Provides a permanent record of indications
  • Ongoing monitoring capability
  • High-temperature capability

Eddy Current Testing (ECT) measures the intensity of electrical currents in a magnetic field. Eddy current testing utilises AC current in a coil near or around a specimen, inducing circulating eddy currents in the material's surface. Flaws and material differences affect these currents, altering the coil's current via mutual induction. Flaw detection relies on measuring electrical changes in the coil, often focusing on voltage changes. Key factors influencing eddy currents include specimen conductivity, magnetic permeability (for ferromagnetic materials), coil-specimen distance, AC frequency, and dimensions. Calibration on test specimens is common, and eddy current testing is highly sensitive to flaws. Equipment ranges from basic meters to advanced computer-programmed systems, with applications including crack detection, component sorting, and metal quality control.

Eddy current inspection is often used to detect corrosion, erosion, cracking and other defects in tubing using electromagnetic induction. A probe is inserted into the tube and pushed through the entire length of the tube. Eddy currents are generated by the electromagnetic coils in the probe and monitored simultaneously by measuring the probe's electrical impedance.

Vertech offers Pulsed Eddy Current (PEC) using Eddyfi® Lyft™ inspection technology. The system allows measurements through non-conductive materials such as insulation, protective coatings, concrete, and marine growth without requiring direct contact with the inspection surface. State-of-the-art instrument; real-time C-scan imaging; fast data acquisition (up to 15 readings per second) with grid and dynamic scanning modes; and great flexibility thanks to extension cables, probe shoes, and an extension pole. Using the Lyft probes, Sonomatic can scan through thick metal and insulation.


Ultrasonic testing is a non-destructive method to obtain wall thickness measurements and determine any flaws in welded components. UT Inspection determines internal and external defects and is an accurate measuring tool for establishing noted flaws' locations and depth.

Ultrasonic Thickness Measurements are typically applied to structures that are often subject to corrosion, erosion, and internal defects such as laminations or inclusions.

Ultrasonic inspection is also applied to welds to detect fabrication defects and, when in-service, to see weld root erosion and fatigue cracks. These techniques rely on favourable orientation of the imperfections to be noted relative to the direction of the applied ultrasound. The geometry of the imperfection, such as pitting, is also a primary consideration.

Vertech Group and Sonomatic technicians are qualified for the full range of UT testing techniques from:

  • Thickness Checking 
  • Ultrasonic Testing of Welds
  • T-Pieces 
  • Nozzles and Nodes
  • Forgings and Castings.

Vertech Group's sister company, Sonomatic, is a leader in such techniques as TOFD and has designed and continues to develop innovative inspection methods that our team of experienced field service engineers applies.

Time of Flight Diffraction (TOFD) can be used for multiple applications; however, it is primarily used for rapid weld testing of circumferential and axial weld seams or perpendicular TOFD scanning. We offer TOFD using the Olympus Omniscan inspection technology. TOFD offers fast weld inspection with excellent flaw detection and sizing capacities. The diffraction technique provides critical sizing capability relative to bevel angle or flaw orientation. TOFD can be utilised independently or in conjunction with other NDT techniques.

  • Based on diffraction, it is relatively indifferent to weld bevel angles and flaw orientation.
  • It uses the arrival time of signals received from crack tips for accurate defect positioning and sizing.
  • Precise sizing capability makes it an ideal flaw-monitoring method.
  • Quick to set up and perform an inspection, as a single beam offers a large coverage area.
  • Rapid scanning with imaging and full data recording.
  • It can also be used for corrosion inspections.
  • Required equipment is more economical than a phased array due to its conventional nature (single pulser and receiver). And the use of traditional probes.
  • Highly sensitive to all weld flaw types.


This method is used for detecting surface and near-surface flaws in ferromagnetic materials and is primarily used for crack detection. The specimen is magnetised locally or overall; if the material is sound, the magnetic flux is predominantly inside the material. If, however, there is a surface-breaking flaw, the magnetic field is distorted, causing local magnetic flux leakage around the flaw. This leakage flux is displayed by covering the surface with very fine iron particles applied either dry or suspended in a liquid. The particles accumulate at the regions of flux leakage, producing a build-up that can be seen visually even when the crack opening is very narrow. Thus, a crack is indicated as a line of iron powder particles on the surface.

Dye Penetrant Inspection is a simple, low-cost method of detecting surface-breaking flaws such as cracks, laps, porosity, etc., in non-conductive materials, for example, Stainless Steel, Inconel, etc.

Corrosion under insulation (CUI), corrosion blistering and scabs, flow-accelerated corrosion (FAC), corrosion under fireproofing (CUF), and corrosion under coatings are possibly the most significant unresolved asset integrity problems in the industry. Current methods used to measure wall thickness over lift-off without removing insulation all have severe limitations, and existing pulsed eddy current (PEC) solutions rely on outdated technology. It's time for evolution.

Sister company Sonomatic offers a Phased Array using Eddyfi M2M Gekko® inspection technology. The technology covers various applications, from corrosion mapping to crack detection and characterisation in welded pipes and plates. Thanks to its advanced features, Gekko can handle thick components and detect and characterise misoriented defects. Superimposition of CAD files to ultrasonic data also helps our technicians interpret measurements and, therefore, lowers the rate of false alarms.

Benefits:

  • Physical and cloud storage of data with no degradation.
  • Multiple weld images are included with the data.
  • Results are auditable on-site or remotely every day. Setup and equipment data/configuration are included in the report.
  • High probability of detection for planer flaws either in fabrication or in-service.
  • Ability to assess through-wall depth attributes to determine the location defects accurately.
  • Ability to discriminate among defects stacked throughout the material thickness in a proximate circumferential location.

It detects temperature variations and has been widely used to detect breakdowns of thermal insulation of cryogenic storage vessels and thermal linings of furnaces, etc. Areas of damaged and waterlogged insulation can be detected using this technique.

Thermography does not give a definitive indication of corrosion but highlights areas where corrosion may develop in the future. The possibility of intermittent wetting and drying-out of insulation, especially on hot plants and pipework, leading to a misleading result, needs to be kept in mind.

Short-range guided Wave Ultrasonics makes it possible to inspect hidden areas of concern that are usually unreachable using conventional Ultrasonics or alternative inspection methods. Short-guided Wave inspection utilises bulk wave ultrasonics to effectively scan distances as far as 1 meter along components to screen for areas of material loss from corrosion and pitting.

Benefits

  • Effective screening tool for searching for material loss in hidden locations.
  • Highly productive inspection.
  • Instant Results.
  • Highly portable equipment – equivalent to one UT set and probe.
  • Electronic data.
  • Minimal inspection team (potentially one person).
  • Rope Access deployable.
  • Applications.

Applications

  • Trunnion inspection – highly effective for locating and categorising corrosion within trunnions.
  • Pipe support inspection – Assessment of corrosion found at pipe supports (CUPS).
  • Deck penetrations – Capable of locating and assessing hidden corrosion at deck penetrations.
  • Vessel saddle inspection – Scan the vessel shell for hidden material loss under the vessel saddle.
  • Deck plate inspection – Scan deck plates for corrosion areas on the far plate wall.
  • Storage Tank Annular Ring inspection – Ideal for inspecting tank annular rings where there is no internal access to the tank floor to monitor for corrosion.
  • Soil to Air Interface – Detection of corrosion and material loss below ground level where pipework penetrates the ground.

Radiographic Testing (RT) is a non-destructive testing method of inspecting materials for hidden flaws by using the ability of short X-rays and gamma rays to penetrate various materials. It can be carried out on our clients' sites (under a strictly controlled environment) or within our Radiography bays.

Most radiography concerns the testing and grading of welds on pressurised piping, pressure vessels, high-capacity storage containers, pipelines, and structural welds. Other tested materials include welder's test plates, machined parts, plate metal, or pipe wall (locating anomalies due to corrosion or mechanical damage).

We can carry out radiography in any of our seven purpose-built radiography compounds and on client premises under a strictly controlled environment. We can offer both conventional radiography and Digital Radiography methods. One of the advantages of digital radiography is that it does not require wet chemicals for processing, diminishing the need for chemical use and the associated hazards that come with that process. A smaller amount of radiation is necessary to produce a digital image than that needed to make a conventional film.

Small controlled area photography

SCARPro source projector is used for industrial non-destructive testing applications of gamma radiography with Selenium-75. SCARPro can be used as a category I or II exposure device. When used in SCAR mode (category I), the SCARPro allows radiography to be performed in congested work areas with a minimal distance to the controlled areas. When used as a traditional projector (category II), standard Sentinel™ source guide tubes and collimators allow the Selenium-75 source to be used for axial, radial and panoramic exposures.

X-ray systems: OVDX – OpenVision™

Live video x-ray system enables real-time, qualitative screening for corrosion under insulation (CUI). CUI causes unscheduled downtime if not identified and corrected, posing significant cost and safety issues. Identify problem areas quickly, saving valuable time and resources. Scan miles with OpenVision™ versus mere feet accomplished by other NDT methods. OVDX effectively increases inspection productivity in refinery, pipeline and offshore environments. Video images and still image captures can be stored using a DVR.
 

Contact Us

"*" indicates required fields

This field is for validation purposes and should be left unchanged.